Intermediate Orienteering Skills
Tried a few beginner courses? You're ready for the next step.
Intermediate orienteering courses may require the following skills:
make a route choice between control points (should I run 200 meters along a trail, or crash through the blackberries for 30 meters?)
increased use of your compass
more off trail travel
become more adept at reading contours (for example, knowing the difference between a reentrant and a spur)
utilize pace counting to more accurately measure distance traveled
Here is a wonderful 2 page summary of many important orienteering skills, created by Bob Burg of www.orienteeringunlimited.com (and used with his permission.)
Let's look at what some folks call the core skills of orienteering, and then look at some tips that should take your orienteering skills to a solid intermediate level.
First, let's start off with a . . . Glossary of the Top Five arcane yet useful orienteering terms . . .
Just kidding. These are important, and you need to learn them. You may well use some or all of these skills on an intermediate course. For an advanced course, you may use all of them on the same leg!
1) Collecting feature
Definition: An obvious feature that you see and make note of as you move from one control to another.
Using collecting features allows you to track your progress and confirm your location. “Thumbing the map”, a technique discussed in the beginner skills section on this website, is related to this. As you locate and pass collecting features, hold your thumb on the map at the last known feature. Your thumb provides an instant “you are here” marker showing your location at all times. YouTube video on collecting features
2) Handrail
Definition: A linear feature such as a road, stream, or fence line that leads in the general direction of your objective.
Following a handrail is usually much easier and faster than following a compass bearing. YouTube video on handrails
3) Catching feature
Definition: A large or linear feature that acts as a backstop, and “catches” you if you'd gone too far past a control point.
If you have a large and obvious catching feature close beyond the control, you may choose to run quickly to the area of the control, knowing that if you go a bit too far your catching feature will guide you back. Conversely, if you do not have a good catching feature near the control, it may be smarter to move more slowly. YouTube video on catching features
4) Aiming off
Definition: A technique where you intentionally aim to go to either the left or the right of your objective when it is along a linear feature.
In the example below, you are high up on a ridge and want to return to your car at the trailhead. If you followed a compass bearing of 90° (due east) to the trailhead, you may wander off to the left and miss it entirely. However, if you instead travel on a bearing of about 120°, more in a SE direction, you will be sure and hit the road. Then, you turn left, walk for a short distance along the road, and reach the trailhead. YouTube video on aiming off
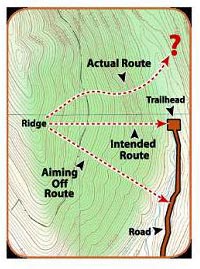
Example of aiming off
5) Attack points
Definition: A distinct, easy to find object fairly close to the control point, that you use as a base from which to “attack” the final control.
For example, a control might be in the middle of a field of small boulders, and quite hard to find. However, about 50 m away from the boulder field is an obvious trail intersection. This intersection becomes your attack point. Run as fast as you can to this intersection, then get out your map and compass. You determine that the control is about 50 m away to the southwest. You then travel more slowly to hit the control. YouTube video on attack points
Many of us use the idea of an attack point when traveling around a city. If you want to give directions to a friend who wants to go to your house, you could give them detailed driving directions all the way from their house to yours. Or, you could use the idea of an attack point, by saying, “Do you know how to get to the Safeway store on Main St? Good, I'm just two blocks south of that intersection.”
Now that we’ve covered the core skills, let's look at a few tips.
Using the “CAR” for faster times
CAR is an acronym (Control, Attack point, Route), which hopefully reminds you that the best way to a control is often to think of it in reverse. Huh!?
Here's how it works:
Most beginners will look for control point first using the Route, then the Attack point, and then finally the Control (RAC).
A more refined way to do this is using the exact opposite approach, or CAR. First, check your clue sheet for the control description, so you know precisely where the control is located (tree, vegetation boundary, trail intersection, pit, etc.)
Then, choose an attack point from which is most suitable to approach the control.
Finally, after you picked an attack point, choose the best route to reach it. Going through this mental checklist of Control, then Attack point, then Route will hopefully give you a solid plan that will take you to the next control, as opposed to trotting off in the general direction of the next control, and having to generate a plan on the run.
Running “through” the control
In orienteering, it is not considered good form to loiter near a control point, as it can give other participants an unfair advantage. Beginners often do this while they think about the next leg and examine their map.
Instead, try to develop the habit of moving quickly into the control point and out again towards your next control. As you see your control flag from a distance, resist the temptation to dash right to it, punch it, catch your breath, and spend a minute looking at your map figuring out your next move. Instead, as you see the control, take a glance at your map, and determine the general direction in which you need to go to the next control. Now, you can approach the control flag at a trot, punch quickly, and then move out and away from the control toward your next objective.
Pace counting
Pace counting is a technique of measuring more precise distance by counting the number of times an alternating foot hits the ground and comparing it to your known pace over a specific distance. This is typically determined at a high school running track, where you walk or jog 100 m several times. Each time your left foot hits the ground counts as one pace.
Of course, your pace count over a given distance changes depending on several factors - how tired you are, whether you're running or walking, whether the terrain is steep or flat, thickly vegetated or open, etc. Expert orienteers know their different pace counts through a variety of terrain. At the intermediate level, it's most useful to know one pace count for a flat high 100 m, and make slight adjustments up or down depending if you are moving slowly or quickly. So, head out to your nearby track, and determine your 100 m walking pace count. If you are a runner, you might try figuring your pace count at the pace you think you’d run at in orienteering meet.